
How to Host a Meeting
Everything a host does once the meeting is under way.
This guide covers what you do from inside a meeting: letting people in, looking after them once they are there, recording, and ending the meeting. Setting the room up beforehand is covered in How to Create a Meeting Room.
1. Find Your Way Around the Room
On a computer, a meeting looks like this:
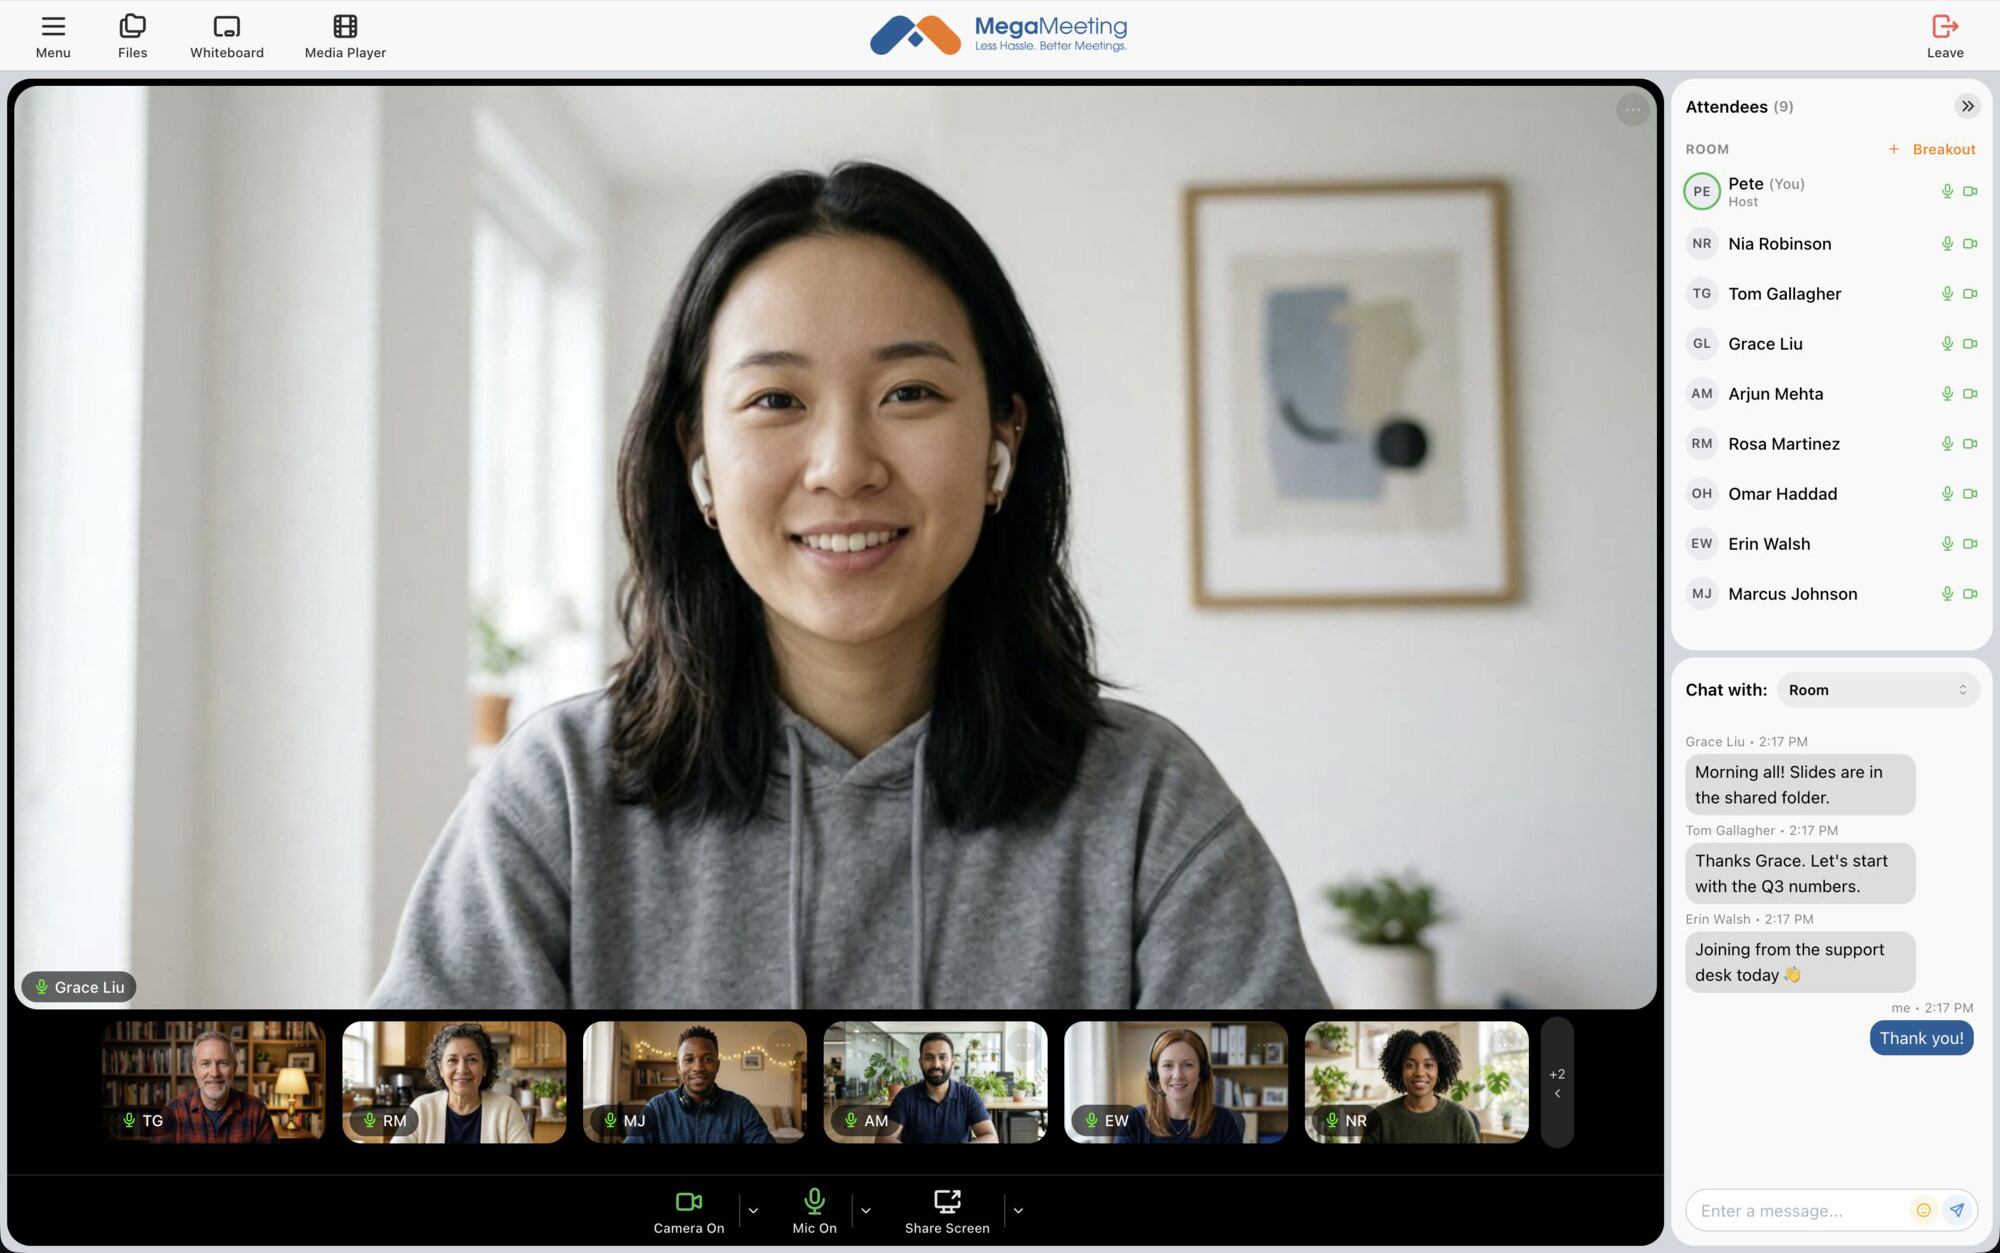
- Menu holds the room's controls: Share Link, Lock Room, Manage Recording, the dial-in number and Conference ID when the room has a phone line, and Leave.
- Files, Whiteboard and Media Player share documents, a whiteboard, and video or audio with everyone.
- Attendees lists everyone in the room, and Chat sits beneath it.
- Camera, Mic and Share Screen are your own camera, microphone and screen.
On a phone the same controls are there, arranged to fit the smaller screen.
2. Who Counts as a Host
- An account host: someone signed in to your MegaMeeting account who opened the room. Their Menu reads Room: 1234567 (Host) at the top.
- A co-host: an attendee made a co-host, either on the attendee list before the meeting or from inside the room (step 5). They have the same controls for this meeting.
The one difference: only an account host can take the host role back off a co-host, so a co-host can never remove the person who promoted them.
3. Let People In from the Waiting Room
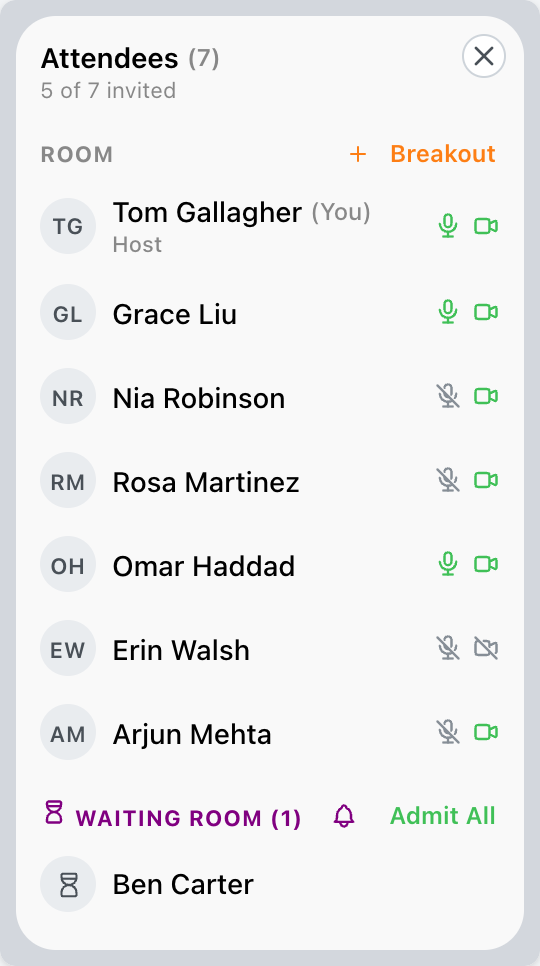
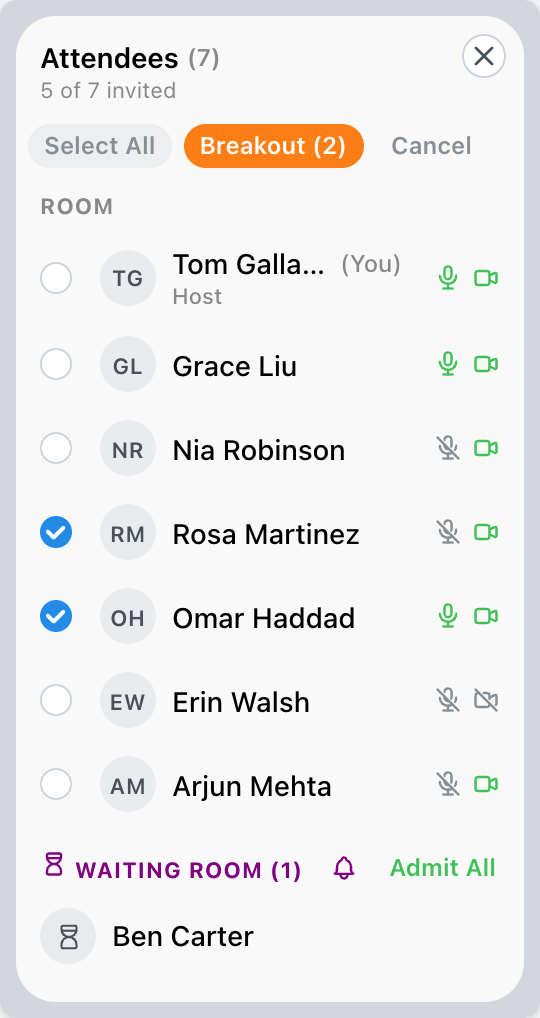
When the room has a waiting room, everyone except hosts and co-hosts waits there until they are admitted, including people on your attendee list. They appear under Waiting Room at the bottom of the attendee list:
- Click a name and choose Admit to Room or Reject.
- Admit All lets everyone waiting in at once.
- The bell beside it is the doorbell: a sound each time someone arrives. Click it to turn the sound off or on.
Someone you have admitted who drops out and reconnects comes straight back in, without waiting again.
4. Open an Attendee's Card
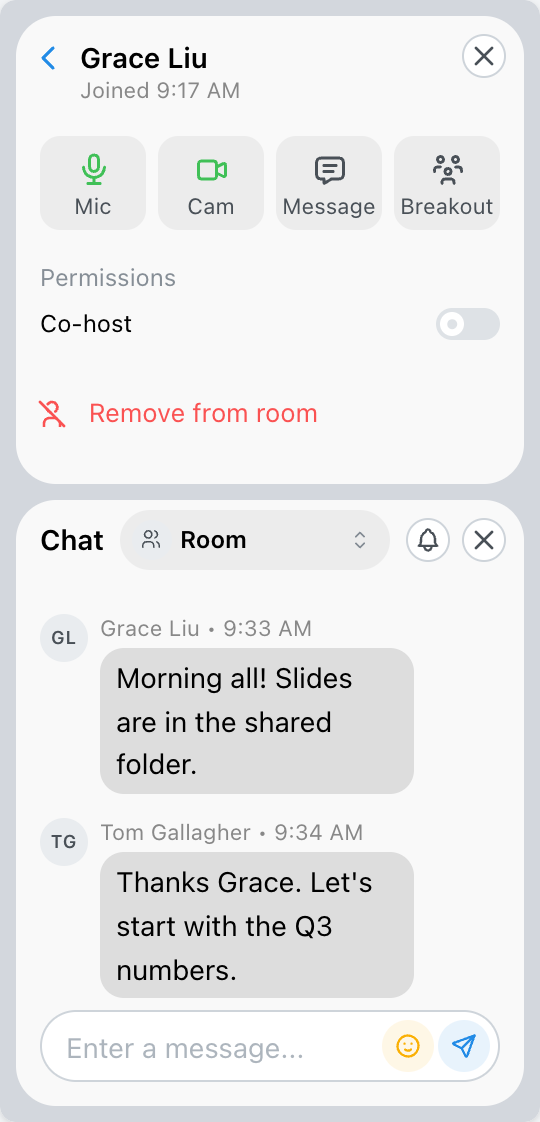
Click anyone in the attendee list to open their card. The header shows their name and when they joined; the arrow takes you back to the list. The card holds:
- Mic and Cam: mute or unmute them, and turn their camera off or on. The icon shows how they are now, and the tooltip says what a click will do.
- Message: a private chat with them.
- Breakout: choose people for a breakout, with them already ticked (step 8).
- Co-host: the switch that makes them a host (step 5).
- Remove from room: disconnects them from the meeting.
5. Make Someone a Co-Host
Turn on Co-host on their card. A confirmation explains that they will be able to start and stop the recording, and admit and remove other attendees. Click Make co-host.
It applies to this meeting only: the room's attendee list is not changed. To make someone a co-host for every meeting in the room, tick Co-Host on their entry when you edit the room.
6. Record the Meeting
Open Menu and choose Manage Recording. Before you start, you can confirm what this recording will capture: composite layouts or individual streams, and which layouts. They start as the room's settings, and a change here applies to the recording you are about to start. Then click Start Recording.
When the room is also set up to stream, the window offers Record, Record + Stream and Stream Only instead.
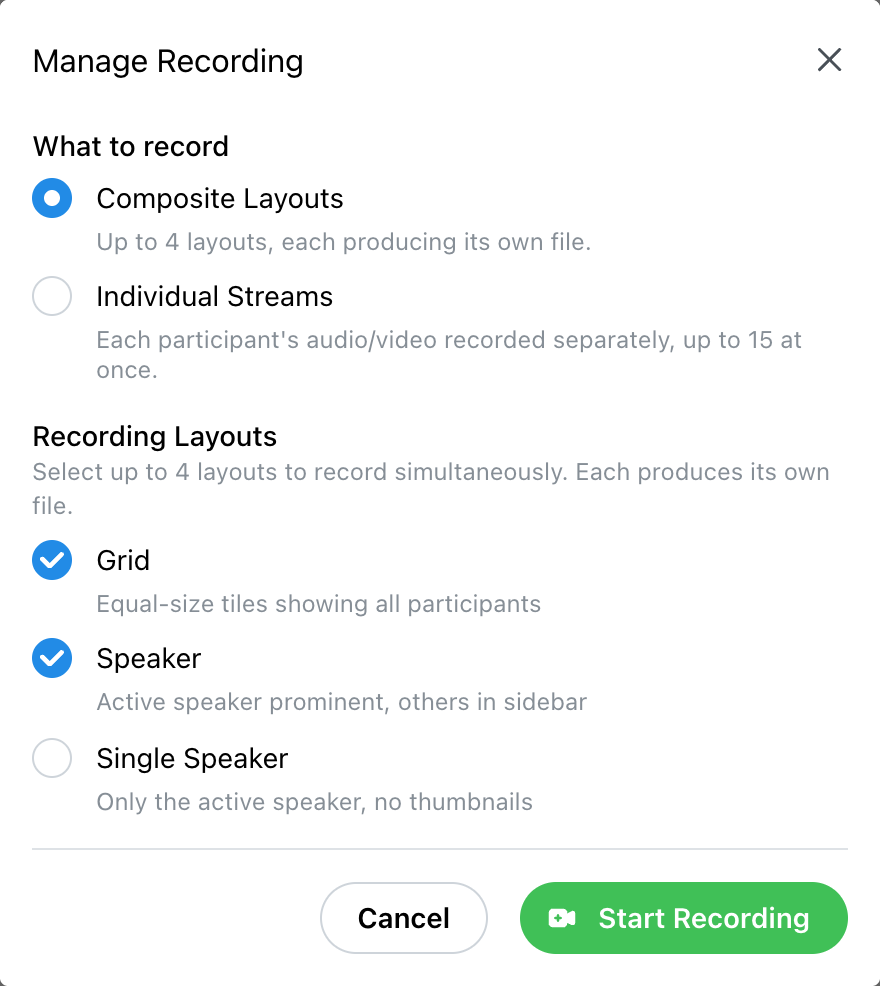
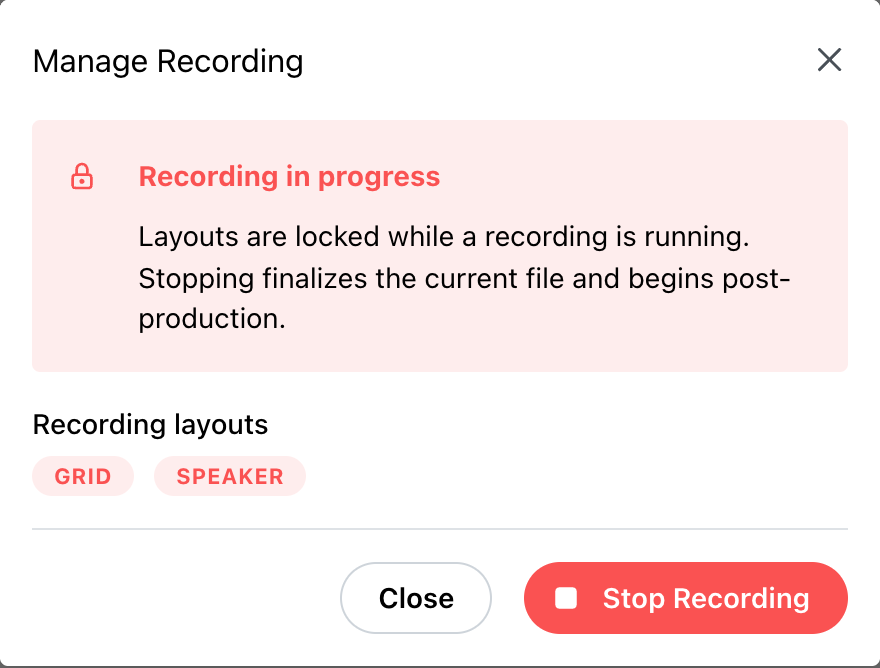
While it runs, the menu entry reads Manage Recording (live) in red, and the window shows which layouts are recording. Click Stop Recording to finish; the file is then processed and appears under Recordings on your dashboard.
7. Approve Screen Sharing
Hosts, co-hosts and the people on your attendee list share their screens without asking. Anyone else asks first, and you see “[Name] would like to share their screen” with Approve and Deny. The request stays on screen for 30 seconds.
8. Breakout Rooms
In a room with breakout rooms turned on, click Breakout on the Room line of the attendee list. Tick the people to send, then click Breakout (2) (the number is how many you ticked). Once a breakout exists, the same button lets you add people to it or start a New Breakout. Cancel backs out.
The Breakout tile on someone's card opens the same choice with that person already ticked. Breakouts are listed in the attendee list under their own names, and a host ends one with End Breakout: everyone in it sees a five-second countdown and is brought back to the main room. More in How to Use Breakout Rooms.
9. Lock the Room
In Menu, Lock Room stops anyone else from joining, including by phone. Everyone already in stays. The same entry reads Unlock Room while locked.
10. End the Meeting
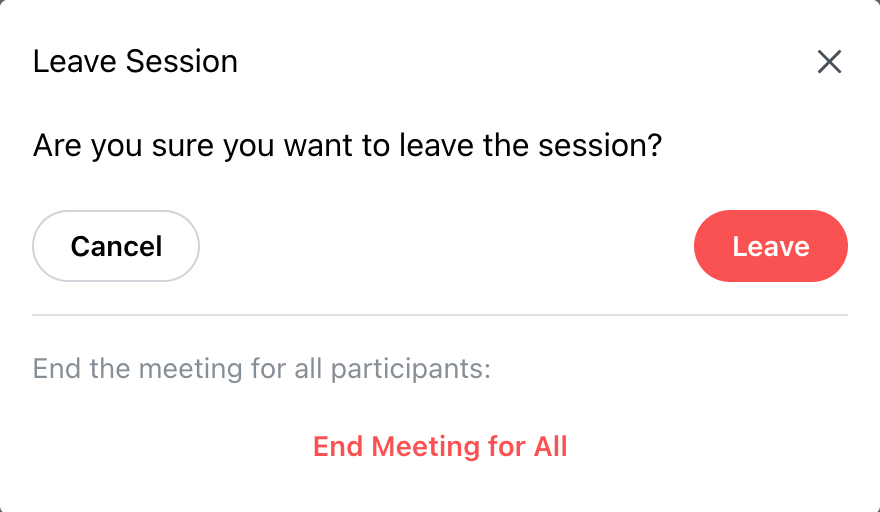
In Menu, Leave asks whether you are sure. Its Leave button disconnects you and leaves the meeting running for everyone else. Below it, hosts also see End Meeting for All, which disconnects everyone and ends the meeting.
What a Host Cannot Do
- Demote a co-host, if you are a co-host yourself. Only an account host can take the host role off a co-host.
- Leave the meeting with no host. The last remaining host cannot be demoted.
- Make an Observer a co-host. Observers watch a stream of the meeting rather than joining it.
- Change an attendee's email address. The address is how they prove who they are, so it is corrected on the room's attendee list instead.
Explore MegaMeeting